Pages

Tuesday, November 1, 2011

Men's Shirt To Cute Skirt

Last week, Sherry from my favorite blog Young House Love issued a "Pinterest Challenge" to create something based off an inspirational picture found on Pinterest. I wasn't able to make something for the last Pinterest Challenge this summer, so I didn't want to miss out this time. I decided to turn one of Alan's Oxford shirts that didn't fit him anymore in a cute skirt!

Here's a sneak peek of the finished skirt:


These were my inspirational pictures from Pinterest found here and here. 
                                 

First I cut the shirt straight across underneath the pocket.


I tried it on to make sure it would fit, then I turned it inside out and pinned the side seams at the waist. I sewed the sides to create an A line shape, then trimmed the excess fabric.


Next I cut off one of the sleeves at the shoulder seam, removed the cuff, and cut along the underarm seam so I ended up with a flat piece of fabric. I cut two pieces about 4" wide for the waistband and ironed on fusible interfacing to make it sturdier. I sewed the two pieces together, and pressed under 5/8" on one of the long sides of the waistband (this makes it easier to finish the inside of the skirt). The stripes on the skirt are vertical, but I wanted the waistband to have horizontal stripes, so using the sleeve was perfect!


I sewed a gathering stitch along the back of the skirt, then aligned the seam of the waistband with the center back of the skirt. I pulled up the stitches to make it fit, then sewed on the waistband.


To make the corners of the waistband along the front of the skirt, I folded the waistband with the right sides together, and stitched along the edge. After trimming the excess waistband off, I turned it right side out.


Now the folded under edge of the waistband covered the seam on the inside of the skirt, and I slipstitched the inside by hand so it doesn't go all the way through. 


I added two hook and eyes to the top of the waistband. I could have used larger ones like you usually see on pants, but I only had the smaller ones on hand.


Here are pictures of it all finished from the front and back. This was a quick project that was a lot of fun!


Monday, October 31, 2011

Happy Halloween!


Here are some pictures of the tombstone cupcakes I made for our Halloween party on Saturday. First I used chocolate frosting to write RIP on Milano cookies.


Then I used a cupcake plunger to scoop out the middle of the cupcake.


I filled each cupcake with a scoop of cherry pie filling.


And then I put the piece of cake back on top, with one end sliced off for where the cookie will go. 


I put a spiral of chocolate frosting on top, then smoothed it out with a knife. I stuck in the cookie, then sprinkled crushed Oreos on top for mounds of dirt! Here are some finished cupcakes in my new spiderweb cupcake stand.

For the party, we created two haunted rooms. The first one using my dress form, costume, pumpkin head, and a wig to create a scary pumpkin lady. For my sewing room, Alan taped up all of our painting tarps and on the table he placed saws, duct tape, bleach, a "bloody" rag, and a mask. 
With the lights dimmed at night, they were very spooky!


Here is a picture of our dining room table. I bought a piece of lace from Joann Fabrics with skulls for the table cloth, used all of our candle holders, and spray painted some leaves silver. 


We had lots of fun this Halloween. I hope you did too! 


Tuesday, October 18, 2011

Another finished costume!

After my last post about making Alan's costume for the Renaissance Faire, I had made the shirt, but I still needed to finish the pants and make his doublet. Here is a close up of the fabric for the doublet:


And here are some pictures of it all finished:


Here we are ready to go to the Renaissance Faire. 


While we were there, we overheard people saying we looked nice together and several people wanted to take our picture. We had a lot of fun!

Sunday, September 25, 2011

House Painting: Part 2

We have been very busy since the last house painting update. After work this week, I powerwashed the retaining wall on the side of the house one night. I also cleaned the front walkway another night, which was begging to be washed... 


Here's a better picture where you can see the difference between the clean left side and the dirty right side.

After I was all done, the walkway looked almost brand new!


The weather forecast said that it was going to rain all weekend, so I was disappointed that we wouldn't be able to get any painting done. On Saturday I did some shopping while Alan watched the Iowa football game. Afterwards, we realized that it still hadn't rained and decided to start painting the front of the house at 4:30. 


I didn't think we would get much done, but we painted for 3 hours and almost finished the entire front wall! On Sunday morning we started at 9am and Caitlin came over to help too. We finished the rest of the front pretty quickly. I also worked on painting the front porch. 

BEFORE

AFTER


 Here is a closer picture of the freshly painted front porch. I picked out a color called "Raffia Cream" from Home Depot. It is just a bit lighter than the original porch color. You can see the difference if you look at the house numbers, because I didn't paint the wood background.


While I was working on the porch, Alan and Caitlin were working on the chimney. They scraped all of the sides and painted the back side from the roof.


 Can you believe we finished the front this weekend? We haven't painted the window ledges yet because we're not sure which color we want to use. We might use the same cream as the front porch or might just paint them the same color as the house. Which color do you think would look better?


Sunday, September 18, 2011

House Painting: Part 1

We're painting the outside of our house! Every time I tell someone that they say I'm crazy! That may be true, but I don't care!

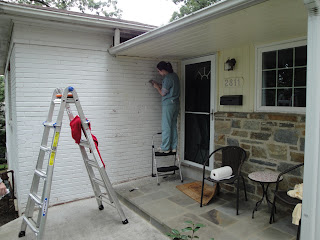
We started at the back of the house and scraped off all of the peeling paint.


Last week we painted for two hours on Sunday, and we also painted one night after work. We were able to get most of the back wall done:


On Saturday, we worked from 8-10 in the morning and almost finished the back wall. We had to stop to watch Iowa football (right in the middle of the day!). At least they won the game!

Today we got a lot of work done, we worked from 8:30am until 4pm! We started by painting one side of the house. Caitlin came over to help for several hours. It was great to have an extra pair of hands!


After finishing that wall, we starting scraping and then painting the wall by the front door.


While Alan and Caitlin were painting the wall, I started caulking the cracks in the ceiling and walls of the front porch. We are going to eventually paint this area a lighter color than the rest of the house, although I haven't picked out a color yet.


As if that weren't enough, we also used the power washer today to clean the house. I got up on the roof to clean one side of the chimney, and Alan cleaned the other side. Alan washed the side of the house too.


After all that work, we were exhausted! Now we have two sides of the house done, and only two more sides to go!

Sunday, September 4, 2011

Summer Projects

Here are some pictures of projects that have kept me busy this summer:

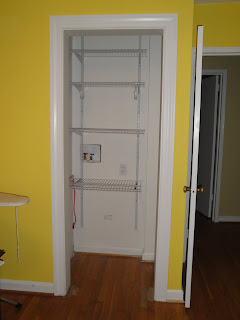
In the spare bedroom, aka my sewing room, we installed shelves in the closet. The previous owners had a stackable washer/dryer in the closet, and when they left there was absolutely nothing in the space. No hanging rod, shelves, or door. Here is the awful before picture:


I primed and painted the walls, and Alan installed the shelving unit. Then it looked like this:


Finally, I found some baskets at the Container Store for gift bags and boxes, ribbons, etc. I also cleaned out a white flower pot and put wrapping paper in it, so now all the gift wrapping supplies are in one place. So organized!!

We also worked on a couple of projects for the guest room. Alan sanded and I painted two nightstands we already had. Here is Alan hard at work using my new power sander:


The after picture of the nightstands is below. But first, I also made a new headboard for the guest bed. I used a piece of plywood, 1" foam from JoAnn's, and an extra brown curtain that I had.


Here I am drilling holes in the legs so I can attach it with bolts to the bed frame:


Here it is after I attached it:

And here is the finished headboard and nightstands!