Pages

Thursday, December 5, 2013

Kitchen Project: Week 4

Look at how much progress we've made!


We are getting very close to being done! Our new booth is just waiting for the granite countertop, but it is looking great. There are just a few more things that need to done, like grout for the backsplash and installing the new window. We plan to do some serious cleaning this weekend because there is dust everywhere. Then we can start moving things back into the kitchen!

Tuesday, November 19, 2013

Kitchen progress: Two weeks in

We are making slow but steady progress on the new kitchen. This weekend we picked out the backsplash tile. Here are all the samples together. On the left are the maple cabinets in a medium brown finish, tile for floor at the bottom, granite counters in the middle, backsplash tile on top, and green wall color in the middle. 


We also picked a light fixture for over the new booth! This isn't the best picture because I was right underneath the light but at least you can see the shape. It's much smaller in person and not distorted. 


Today was the second day of laying the tile floor. They are almost done, just have to finish the step. 


The big holes in the walls are patched and electrical is ready to go. 


The most exciting news is that our appliances came today!


We opened up the fridge and it is amazing! My favorite parts are the ice maker on the door and the freezer has a special spot for pizza storage! You can slide a frozen pizza right in the front. 


Tomorrow the cabinets are being delivered! It's going to start looking like a real kitchen soon!

Tuesday, November 5, 2013

Demo starts today on our kitchen!


Its official, we are getting a new kitchen!! Today our contractors began ripping out everything. Alan and I are so excited and can't wait until this project is finished. For our sanity, this isn't a DIY project. We decided to leave this on to the pros. Hopefully it will be finished just after Thanksgiving. 

Here are some before shots of the kitchen after we had emptied everything out. 


Here are the plans so you can get a sense of what it will look like when it's all finished. Our cabinets are a medium brown color with a Shaker door style.
 
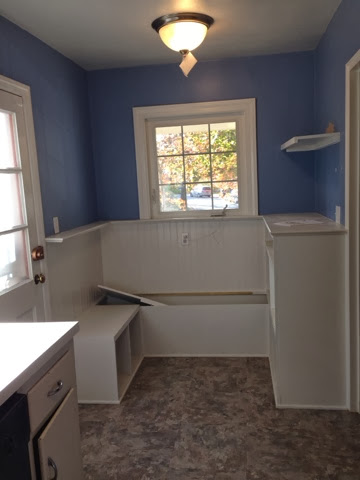
You can see that the side door is gone and replaced with a window. We have only opened that door about 2 times since we have lived here, so we decided to take it out. We will make the opening narrower with a smaller window so that we can extend the cabinets and countertop.
 
To the left of the sink we are going to have a pull out drawer for trash and recycling bins. Alan is so excited! And the big cabinet next to that is going to have pull out shelves.

The microwave is moving from the counter to over the stove. We bought a french door fridge with ice/water on the door (that actually works!). We also bought a slide in gas range, so there is no back to it (just like in the picture). We think it will make the space feel more open, since it is small. The best part is no more cooking on an electric stove! This is my favorite part, and I can't wait!
 
And I don't have a drawing, but the cubby area is going to be turned into a built in booth. We thought long and hard about what to do on that side of the kitchen, and we are really excited about having a booth. Right now we don't have a place to eat in the kitchen, so we are looking forward to sitting with a cup of coffee and enjoying the view the view out our front window. We are using base cabinets for the seats, so they will have open storage and I plan to buy some nice baskets. The tabletop will also give us some much needed counter space.
 
Since our kitchen is so small, we had to make some decisions for function over style. But we are very happy with the overall design and think we have maximized the functionality of our kitchen.

And now for the demolition!!!


Where did it all go??


Oh, there it is. On our front lawn.


Then they loaded it all up on their truck and hauled it away. Like magic our kitchen just disappeared!

Thursday, October 31, 2013

Our Civil War Costumes are Finished!


Happy Halloween!! I wanted to share pictures of how we decorated our house and also our costumes!

Our front porch is ready for fall with a new orange wreath, mums, and some pumpkins. I also planted some yellow pansies in our garden, and the deer haven't eaten then yet. Hurray!


When you come in the front door, I added some spooky art to our chalkboard. I found the design on Pinterest. 


I also rearranged our mantel for Fall. There are two new things: a red wire  thingy that goes over a candle, and a tall basket that is supposedly for catching fish. They were both under $10 each and I like that they go with the colors in the room. 


Our dining room cabinet is also spookified. I added some eyeballs in a jar, books with creepy titles, skulls, and other  thigs I found around the house. It's like a witches curio cabinet!


And now on to what you really want to see...our costumes! We went with a Gone With the Wind/Civil War theme this year. I made Scarlett O'Hara's curtain dress for me and a confederate soldier outfit for Alan. I hope you like them!!


Saturday, July 6, 2013

Civil War Dress: Part 1

This past week I started working on my Halloween costume for this year, Scarlett O'Hara's curtain dress! It's a Gone with the Wind theme this year, and Alan will be wearing a confederate soldier's uniform.

My dress will be made out of hunter green taffeta and will have some gold tassels and cords. I couldn't find a civil war pattern that I liked, so I am improvising. To make the skirt I used the same pattern as my Elizabethan dress.

After cutting out the pieces (7 total) I sewed them all together and gathered the waist. I was so excited when I tried it on my dressform with the hoop skirt underneath! I looped some gold cord around the waist and hung a large gold tassel from the cord.

Now I have to make the bodice, which is going to be more interesting since I don't have a pattern to follow. I'm up to the challenge!


Tuesday, June 25, 2013

Burlap Roman Shade for the Back Door

We've been working on our back door recently so we have a nicer exit to our new patio. The inside door was painted red on one side (and very chipped), so I painted the entire door white. I also replaced the door knob and deadbolt so they would match the new door knobs we replaced throughout the rest of the house. Getting the old knob off was a bit tricky, but we eventually got it off.  


We also replaced the storm door. No more bars!! It's now much easier to see out the window. And the new door has a retractable screen built in.


 Now with these changes the door felt a little bare, so I decided to make a roman shade for it. I used a kit from Joann's that has almost everything you need. I bought some burlap fabric and topstitched green ribbon down each side. 


Doesn't it look so nice on the white door?


I really like how the new shade complements the other shades in our living room. In this picture you can see how the pillows on the sofa go well with the shades. 


This back door project took longer than expected, but I'm so happy with the results! 

Tuesday, May 7, 2013

Spring Pinterest Challenge: Patio Umbrella Pennant Banner

I made a triangle flag banner for our patio umbrella as my project for the spring Pinterest Challenge sponsored by Young House Love. I wanted to add some more decoration to our patio and also to use up some leftover fabric I had when I made pillows for our lounge chairs. I cut out lots of triangles then sewed them together with the right sides facing the inside. I turned them right side out and ironed them flat. Then I sewed the flags together using double fold bias tape. I didn't have time to finish all the flags this week, but I did get 2 sides of the umbrella done. I just love the bright blue and green colors!!


Wednesday, February 27, 2013

All Peeps Go To Heaven!

 It's time for the 2013 Washington Post Peeps contest!! This year I decided to make a scene with peep angels and call it "All Peeps Go To Heaven!"

Here are the two pictures I submitted and their captions (warning: they love peep puns):

Godpeep with his long white beard (and old man eyebrows) watches over all the angelpeeps in Peep heaven. One angelpeep plays the harp, while others are playing a friendly game of poker. Two purple angelpeeps are peeping over the edge to see their peeps on earth.

St. Peeper checks in the newest angelpeep, as the angelic choir peeps their hymns. Two lovepeeps have finally reunited in Peep heaven!


And now for the close ups!


Here are a few behind the scenes pictures. 

Work in progress...


To make the wings, I used card stock to create the shape and then glued a piece of toothpick to the back. 

Then I put hot glue on the card stock and laid a feather on top.


Here's what the back of the wing looked like after cutting off the feather.

Then I flipped it over and glued another feather to the front.


Here is a finished wing!

For the halos, I used gold pins for jewelry making. 

The pins are bendable, so I wrapped them around a marker to get the right size.


Then I just bent one end for the part that would stick into the peep.

I call this the Green Room. The peeps are waiting to make their debut!

Here is the set for the photo shoot. The blue walls of our kitchen made the perfect backdrop to look like the sky.

I hope you enjoyed all the pictures! I know I am a little crazy, but I always have so much fun with the peeps contest. They are just so darn cute!